

Recently I moved into a new house. My previous house was mostly Insteon devices and I used Indigo running on a Mac Mini as my home automation software. Before moving I had slowly started dabbling with Home Assistant and got a bunch of my Insteon devices communicating with HA via MQTT. This was great as a starting point but now I had two separate automation platforms to deal with and I was slowly moving everything that I could out of Indigo and into HA.
The move was extremely motivating to completely stop using Indigo because I had to start over anyway. Now the question was what should I use to integrate Insteon with HA. There were a few various options I found, including the built in support in HA, but I settled on Insteon-MQTT. I felt like it gave me the flexibility and control that I was looking for.
The main Insteon devices that I use are dimmers and keypads. I ended up settling on them long ago because I couldn't find anything that even closely compared to the quality of hardware and I especially like the LED display of the brightness on the dimmers. To kick things off I needed to get a testing device setup.
Testing Setup
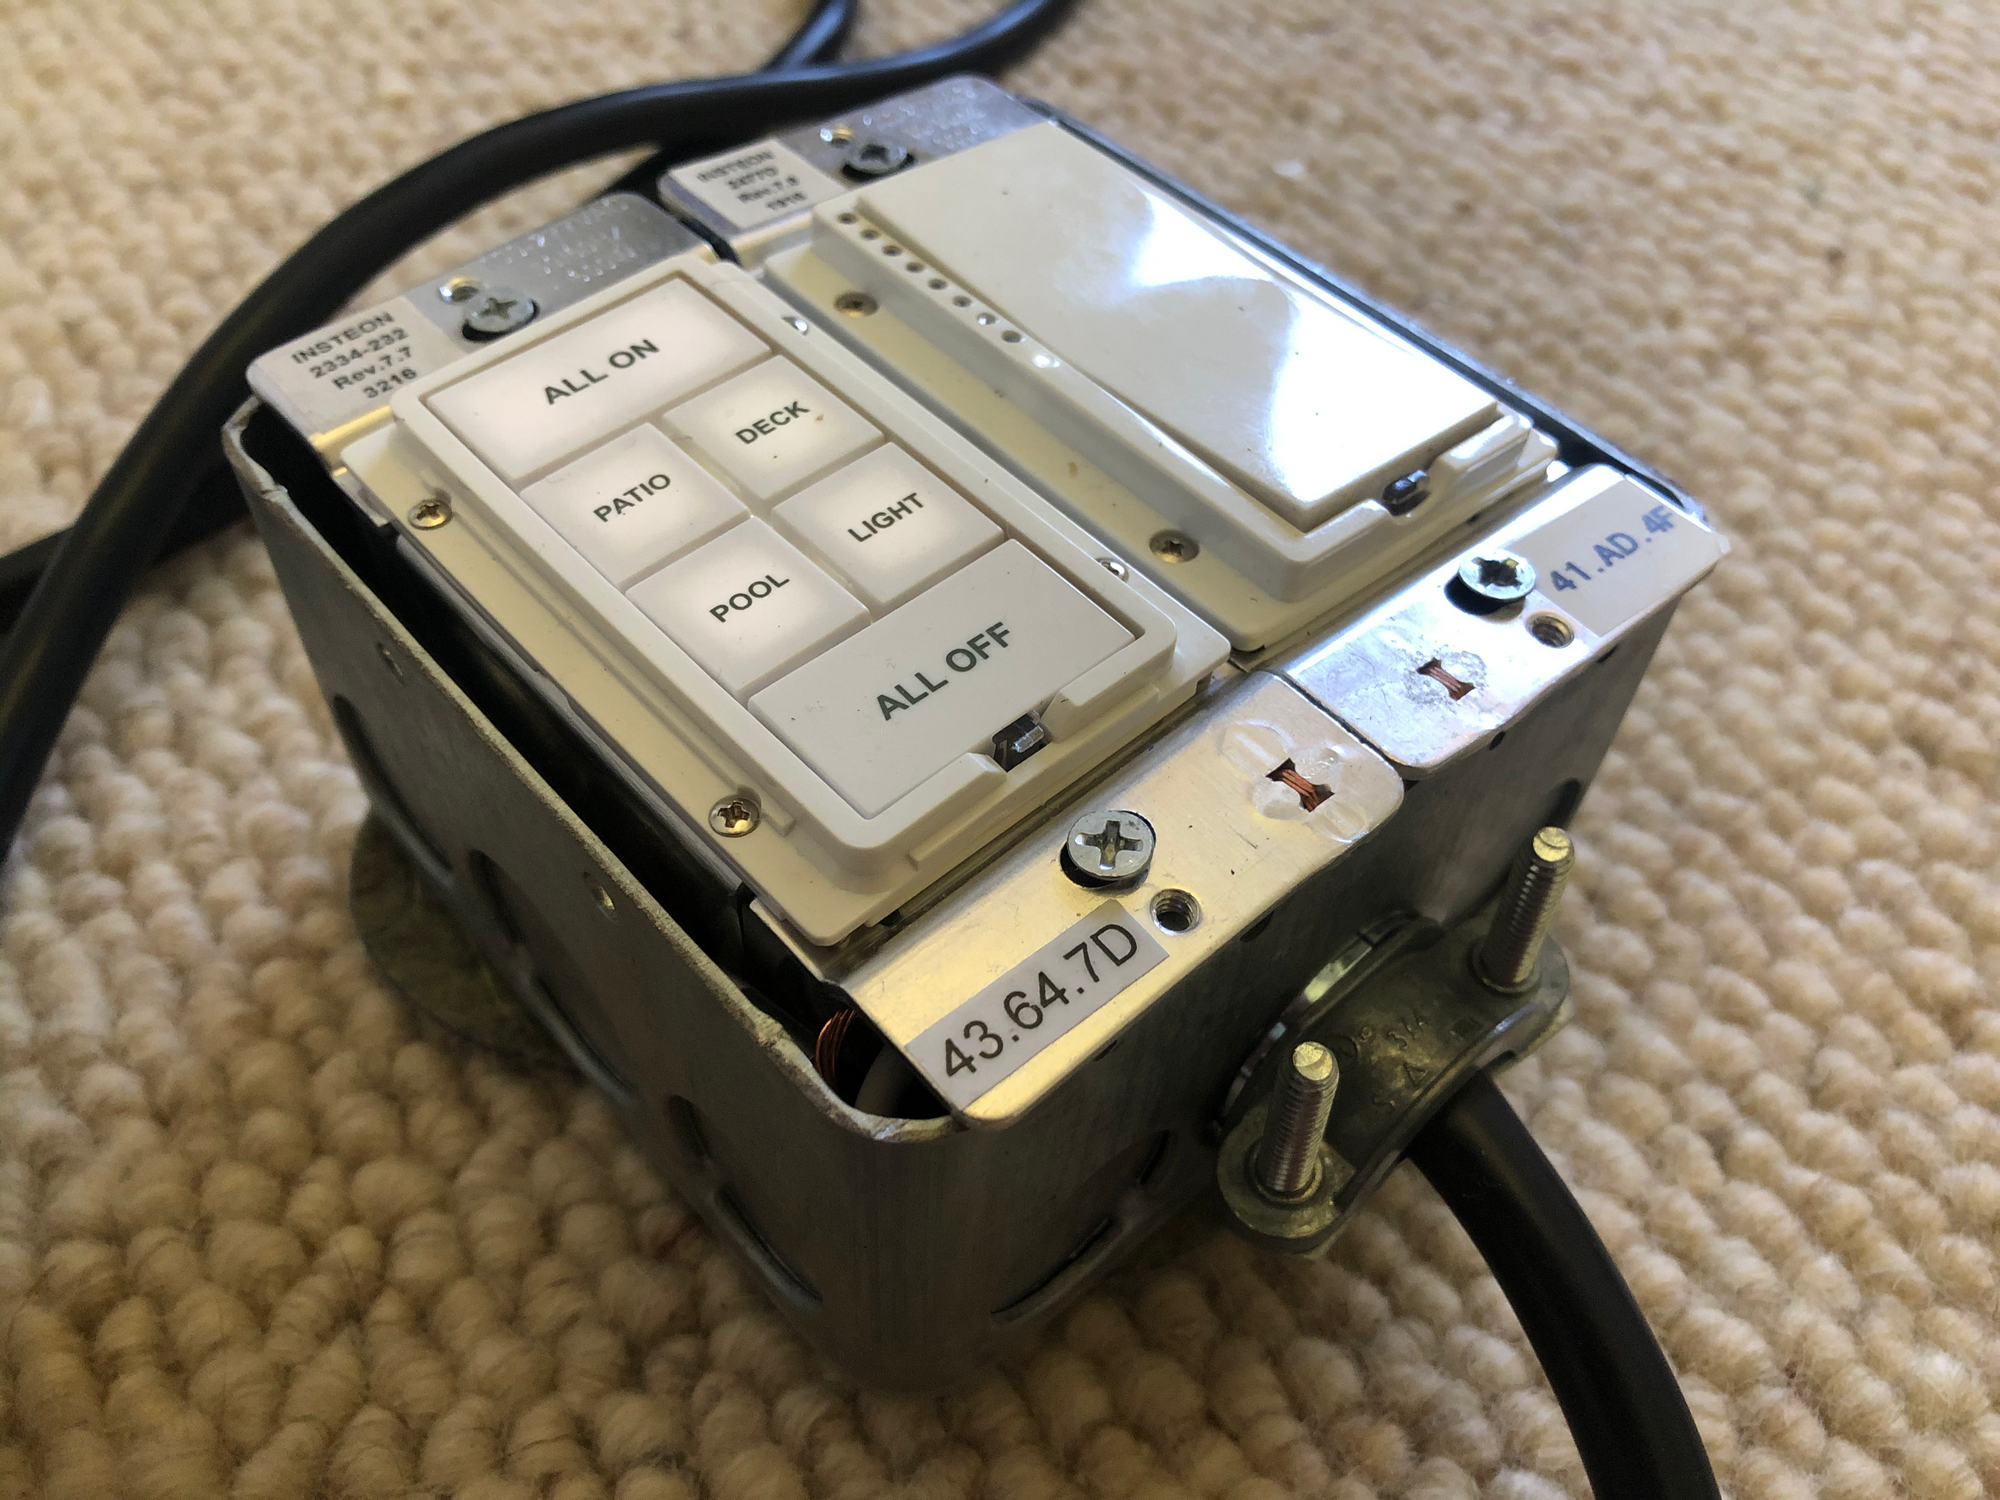
I built this box with a metal electrical box and power cord from Home Depot and installed a keypad and a dimmer. This gave me the flexibility to not completely have to change switches and not have lights work while getting everything setup. All I did different from a normal in-wall install was connected black to black, white to white, ground to ground, and then capped the load with a wire nut. Just be careful to not electrocute yourself and make sure its unplugged before you put a switch in or take one out.
Insteon-MQTT Install
To start with Insteon-MQTT is extremely well documented. They even provide instructions for setting it up as an add-on in Home Assistant, but I opted for installing it as a Docker container I could manage myself.
version: '3.7'
services:
  inseon-mqtt:
    container_name: 'insteon-mqtt'
    environment:
      TZ: ${TZ}
    image: larizzo/insteon-mqtt
    restart: unless-stopped
    devices:
      - /dev/serial/by-id/usb-FTDI_FT232R_USB_UART_A403KDY0-if00-port0:/dev/ttyUSB0
    volumes:
      - config:/config:rw
      - data:/data:rw
volumes:
  config:
    name: insteon-mqtt_config
    driver: local-persist
    driver_opts:
      mountpoint: ${LOCAL_PERSIST}/insteon-mqtt/config
  data:
    name: insteon-mqtt_data
    driver: local-persist
    driver_opts:
      mountpoint: ${LOCAL_PERSIST}/insteon-mqtt/data
Here's the docker-compose.yaml file I use. All you'll need to do is make sure the paths to your volumes are correct, and the devices definition which is pointing to the Insteon PLM thats connected to the computer running Docker. Once you have everything configured you'll just need to run docker-compose.
docker-compose up -dAt this point the container will be up and running but you wont have any devices or the PLM configured. Inside of the config directory that you had mapped as a volume you will find a file called insteon_mqtt.yaml
Config Setup
If you open the insteon_mqtt.yaml file you'll see that its wonderfully populated and commented out showing examples for configuring each type of device as well as examples for integrating into Home Assistant.
PLM
The first thing we need to do is setup the Insteon PLM. Below is an example of my config for the PLM.
insteon:
# Serial device:
# USB PLM modem
port: '/dev/ttyUSB0'
baudrate: 19200
# PLM modem Insteon hex address
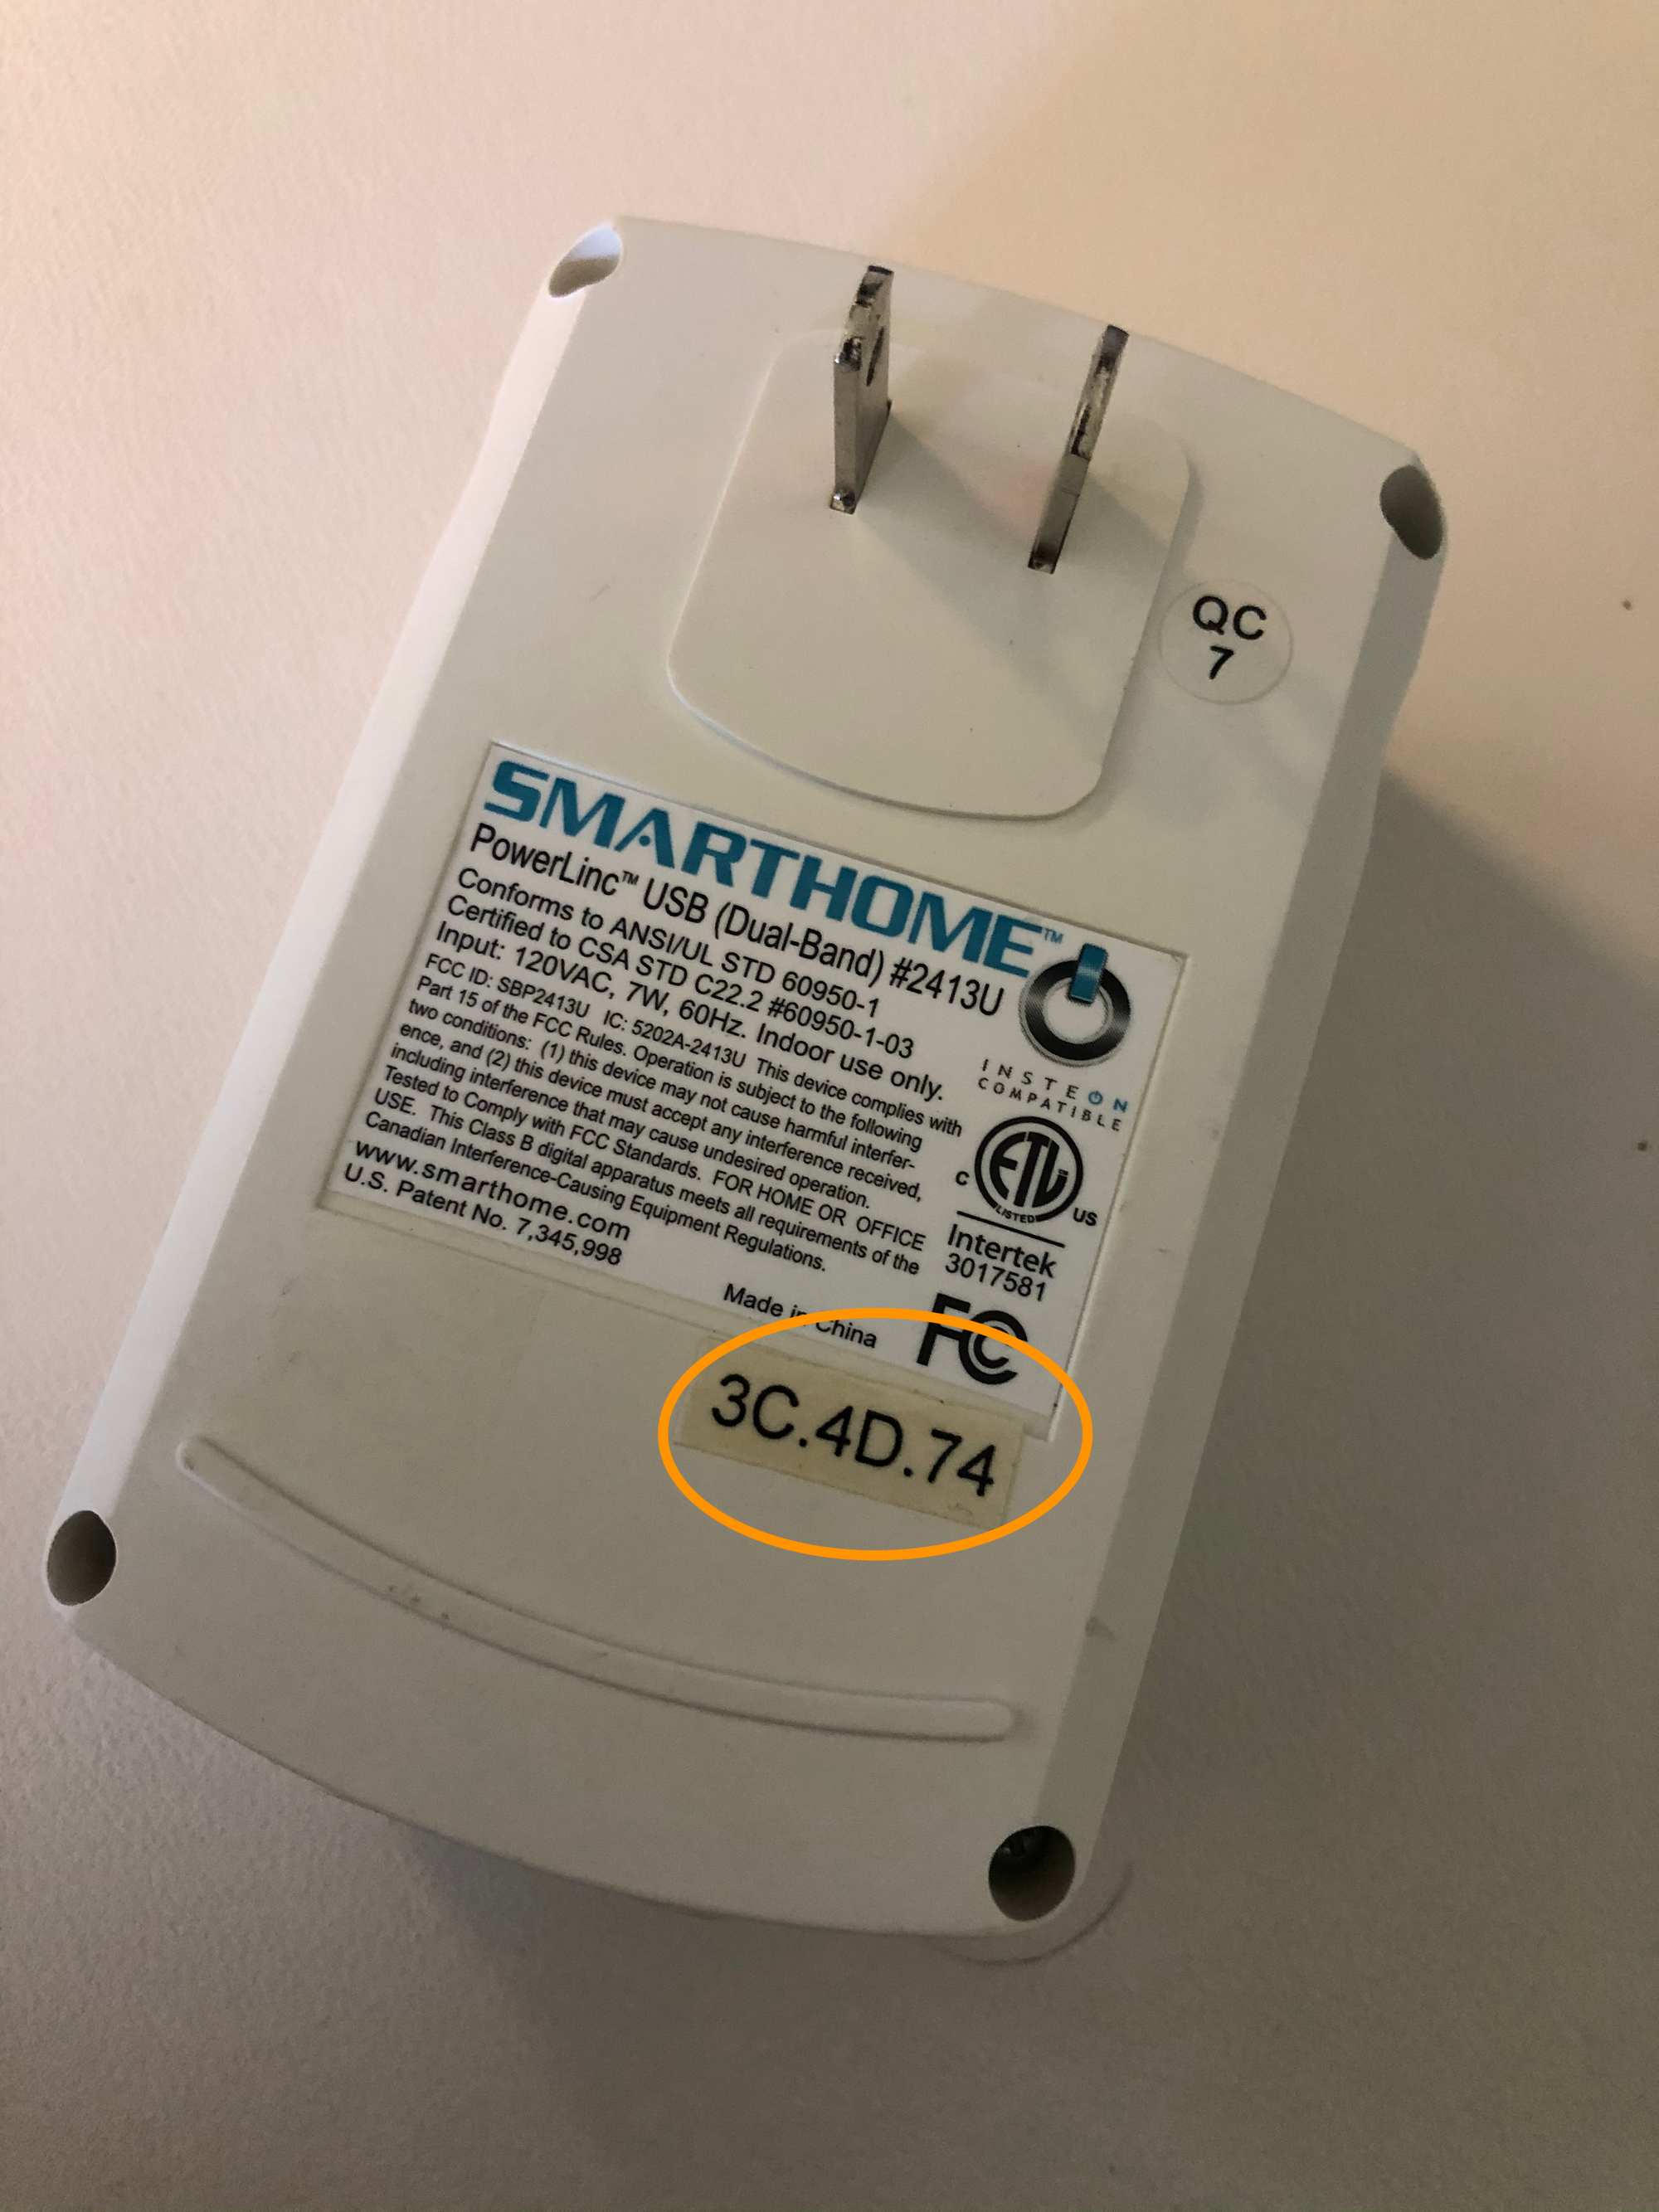
address: 3C.4D.74
# Device database file storage location.
storage: 'data'
# Automatically refresh device states and databases (if needed) at
# startup. This may be slow depending on the number of devices.
startup_refresh: FalseThe only things you'll probably need to modify to get the PLM working is the port, which points to /dev/ttyUSB0 and is also what we defined in the devices section of the docker-compose file. Next you'll need to enter in whatever the actual address is of your PLM which you should find on the back of it.
Devices
Now that we have the PLM setup its time to add our devices. For now I'm just adding a single dimmer but you could just add the addresses of all your Insteon devices in here right now. Insteon dimmers normally have an address sticker on the front of them.
devices:

    # Dimming devices (outlets, wall switches, lamp modules, etc).
    dimmer:
      - 41.ad.4f: 'dimmer'
You'll be putting the address first followed by a colon and then a string for the name of the device.
If for some reason you don't know the address of the device you are able to get it by looking at the logs of insteon-mqtt as long as the device is powered and sending a command. If you are in this situation, restart the docker container after configuring the PLM and go checkout the logs to get your addresses. When I went through this process I used a label maker to add new address stickers to all of my dimmers.
MQTT
Next we need to configure MQTT. You'll need at a minimum the address to your broker and the port. Optionally if you have authentication turned on the username and password.
mqtt:
  broker: 192.168.1.123
  port: 1883

  # Optional broker login data.
  username: yourusername
  password: yourpassword
Once the broker is setup you can take a look at the topics for Dimmers and any of the other supported types of Insteon devices you might need. Below is an example of what my dimmer topics look like.
dimmer:
    state_topic: 'insteon/{{address}}/state'
    state_payload: >
       { "state" : "{{on_str.upper()}}", "brightness" : {{level_255}}, "reason" : "{{reason}}", "mode" : "{{mode}}", "address" : "{{address}}" }

    manual_state_topic: 'insteon/{{address}}/manual_state'
    manual_state_payload: '{ "manual_state" : "{{manual_str.upper()}}", "address" : "{{address}}" }'

    on_off_topic: 'insteon/{{address}}/set'
    on_off_payload: '{ "cmd" : "{{value.lower()}}" }'

    level_payload: >
       { "cmd" : "{{json.state.lower()}}",
         "level" : {% if json.brightness is defined %}
                      {{json.brightness}}
                   {% else %}
                      255
                   {% endif %} }

    scene_topic: 'insteon/{{address}}/scene'
    scene_payload: '{ "cmd" : "{{value.lower()}}" }'
It's very close to the defaults except I've included reason, mode, and address in the state payload as well as uncommented the manual_state topic and payload, which will send dimming start and stop payloads.
Restart, Join, Pair, and Refresh!
At this point all the configuration we need for insteon-mqtt is complete. Before we do anything else go ahead and restart the container.
docker-compose restartOnce the container is back up we need to go through the process of joining, pairing, and refreshing all the devices. This process can be done from the command line or using MQTT. I chose to do it via the command line using docker exec, and I wrote a simple bash script to help keep it simple.
While it isn't necessary I did also choose to factory reset all my dimmers before adding any of them. This can be done by pulling out the small button below the dimmer button, wait ten seconds, and then press in and hold it until the switch stops beeping and then a couple seconds later you'll hear a double beep confirming that the reset was successful. You can find the instructions in the manual as well.
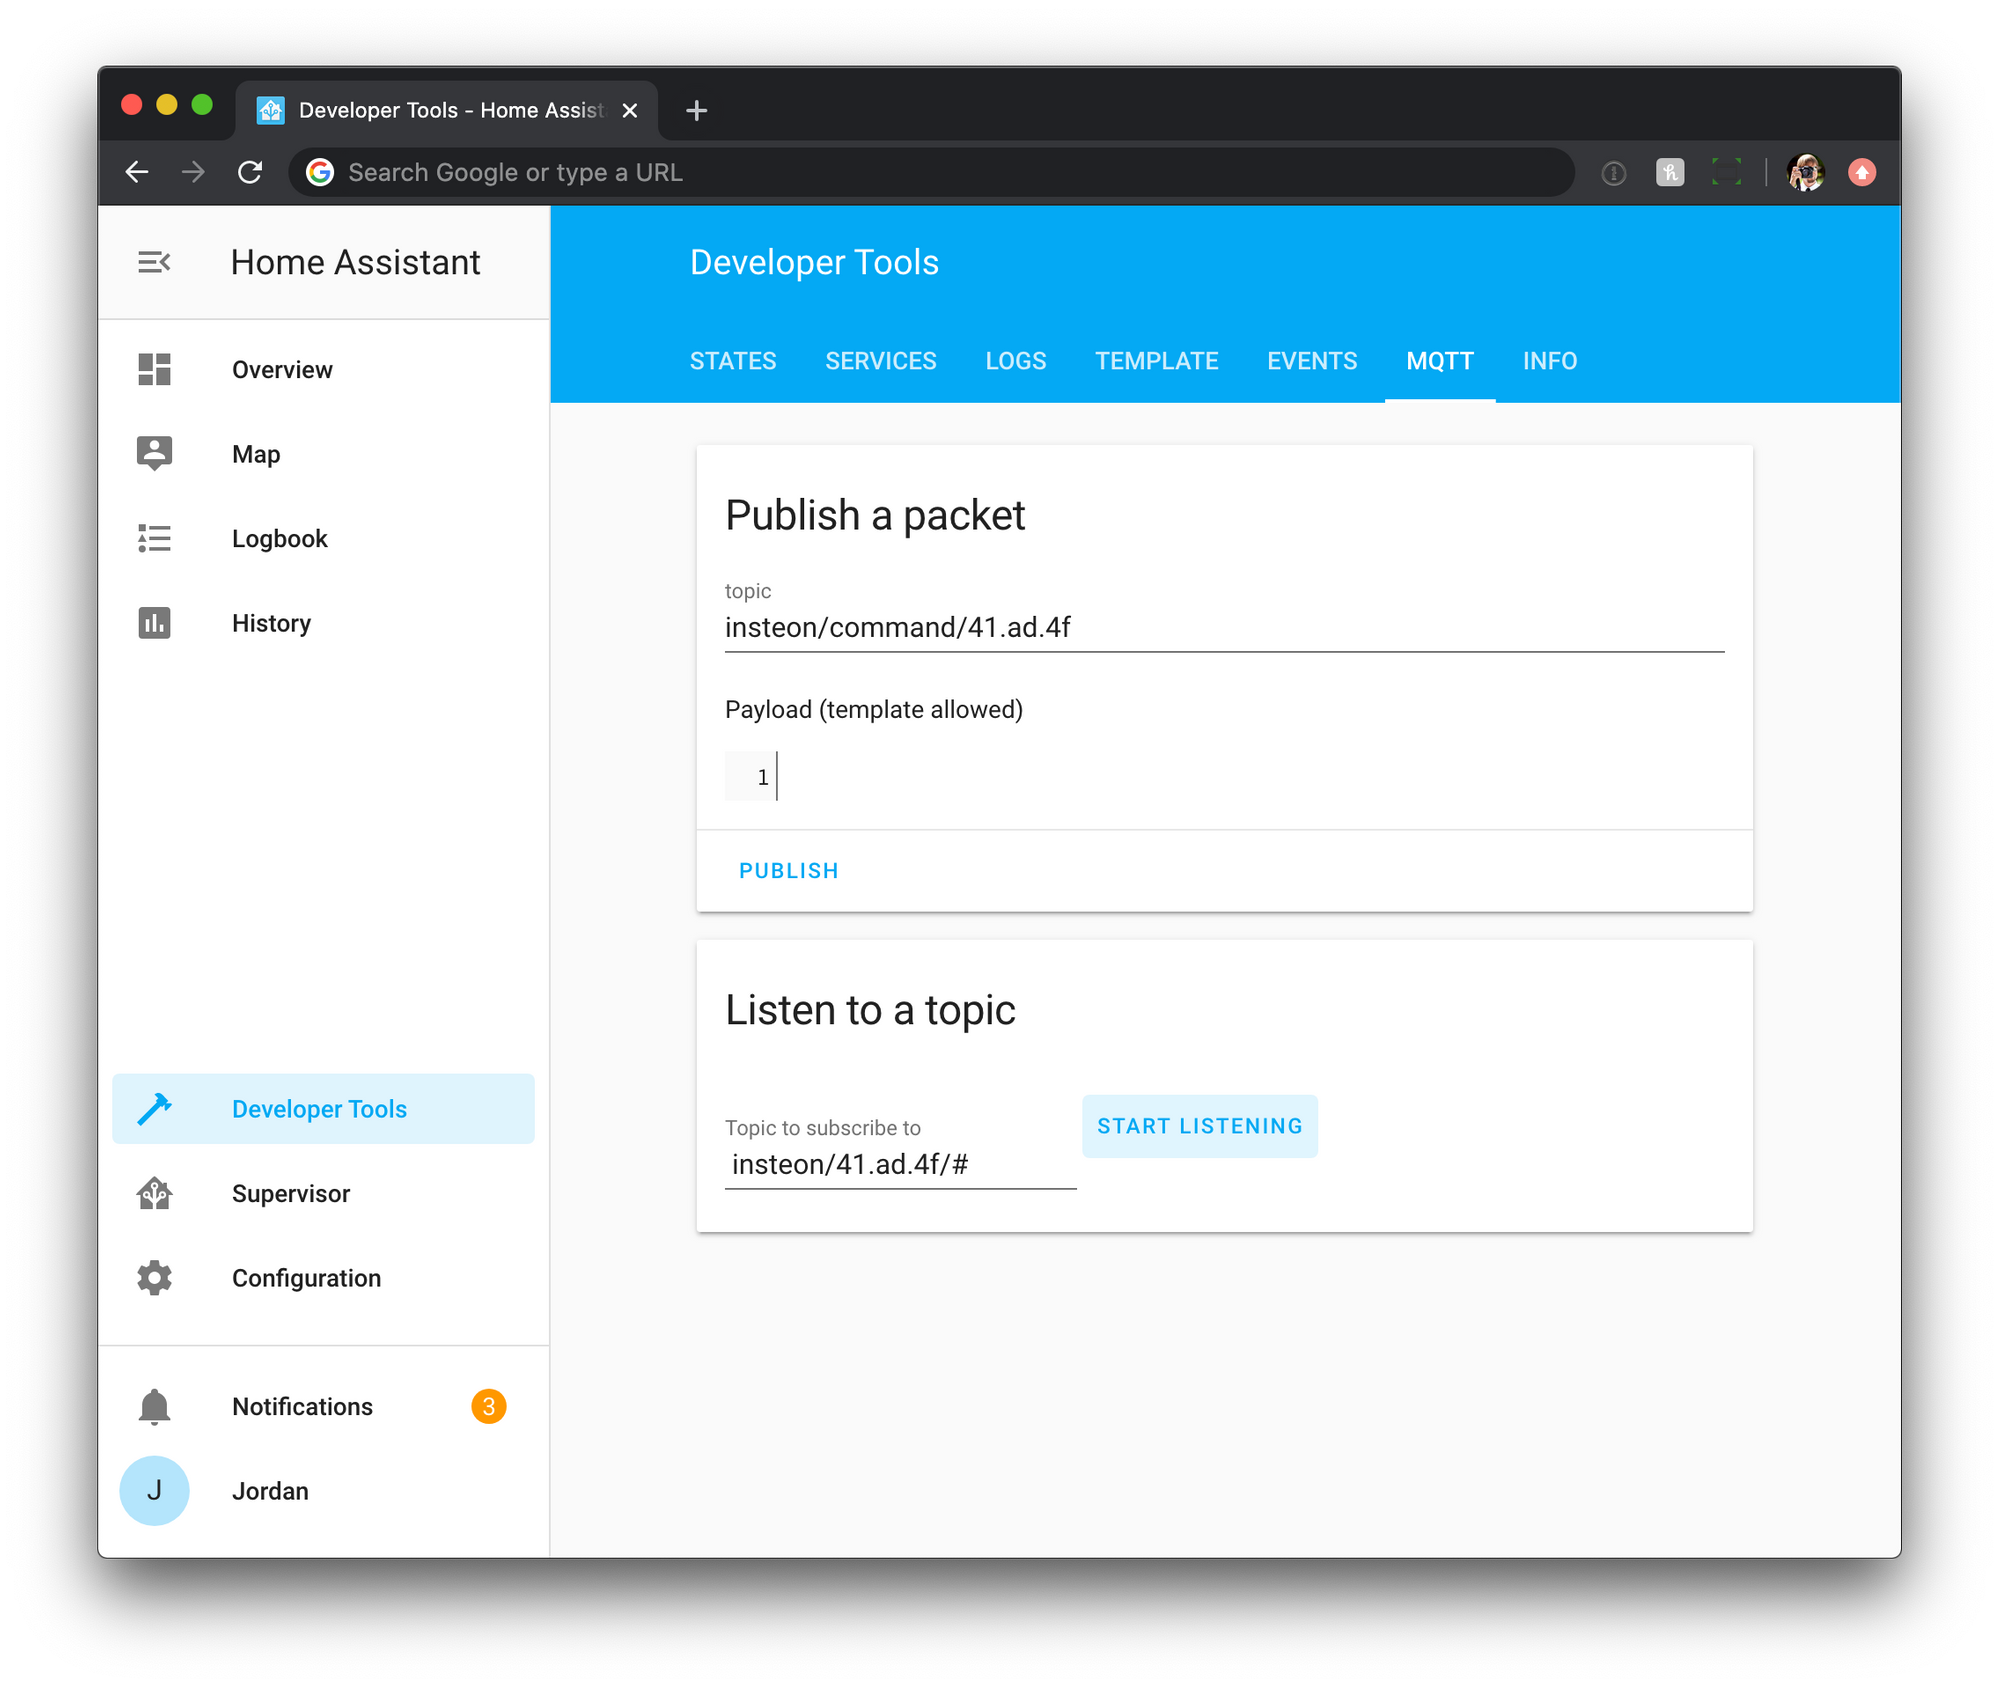
Using MQTT
The topic would be:
insteon/command/aa.bb.ccThe payload would be one of these three:
{ "cmd" : "join"}
{ "cmd" : "pair"}
{ "cmd" : "refresh"}
Using Docker Exec
You can join and pair each device using the appropriate commands, and when done call the refresh-all command. Alternatively you could call refresh on each one individually.
docker exec -d your_instance_name insteon-mqtt /config/insteon_mqtt.yaml join aa.bb.cc

docker exec -d your_instance_name insteon-mqtt /config/insteon_mqtt.yaml pair aa.bb.cc

docker exec -d your_instance_name insteon-mqtt /config/insteon_mqtt.yaml refresh-all
Bash Script
Lets call this script insteon-mqtt.sh. Make sure that the file's permissions are executable, and then type ./insteon-mqtt.sh on the command line.
#!/bin/bash
INSTANCE_NAME='insteon-mqtt'
CONFIG_FILE='/config/insteon_mqtt.yaml'
LINE='-------------------------------------'

echo 'Insteon MQTT Management'
echo
echo 'What would you like to do?'
echo $LINE
echo '1) Join Device'
echo '2) Pair Device'
echo '3) Refresh All Devices'
echo '4) Refresh Device'
echo $LINE

read -p 'Choose option: '
echo

if [ ${REPLY} -eq 1 ]; then
  echo "Joining Device"
  echo $LINE
  read -p 'Device Address (aa.bb.cc): ' address
  echo
  echo "Joining Device: $address"
  docker exec -d $INSTANCE_NAME insteon-mqtt $CONFIG_FILE join $address
  #docker exec -d $INSTANCE_NAME kill -HUP 1
elif [ ${REPLY} -eq 2 ]; then
  echo "Pairing Device"
  echo $LINE
  read -p 'Device Address (aa.bb.cc): ' address
  docker exec -d $INSTANCE_NAME insteon-mqtt $CONFIG_FILE pair $address
  #docker exec -d $INSTANCE_NAME kill -HUP 1
elif [ ${REPLY} -eq 3 ]; then
  echo "Refresh All Devices"
  echo $LINE
  docker exec -d $INSTANCE_NAME insteon-mqtt $CONFIG_FILE refresh-all
elif [ ${REPLY} -eq 4 ]; then
  echo "Refresh Device"
  echo $LINE
  read -p 'Device Address (aa.bb.cc): ' address
  echo
  echo "Refreshing Device: $address"
  docker exec -d $INSTANCE_NAME insteon-mqtt $CONFIG_FILE refresh $address
else
  echo "Please enter a valid option."
fi
exit 1
Testing MQTT
Now that everything should be added, paired and ready to go its probably worth testing it out before trying to put everything in Home Assistant. Home assistant has some built in MQTT debugging under the Developer Tools.
I prefer to use MQTTBox which is a free download. It allows for subscribing or publishing to multiple topics easily, and keeps your setup saved for later.
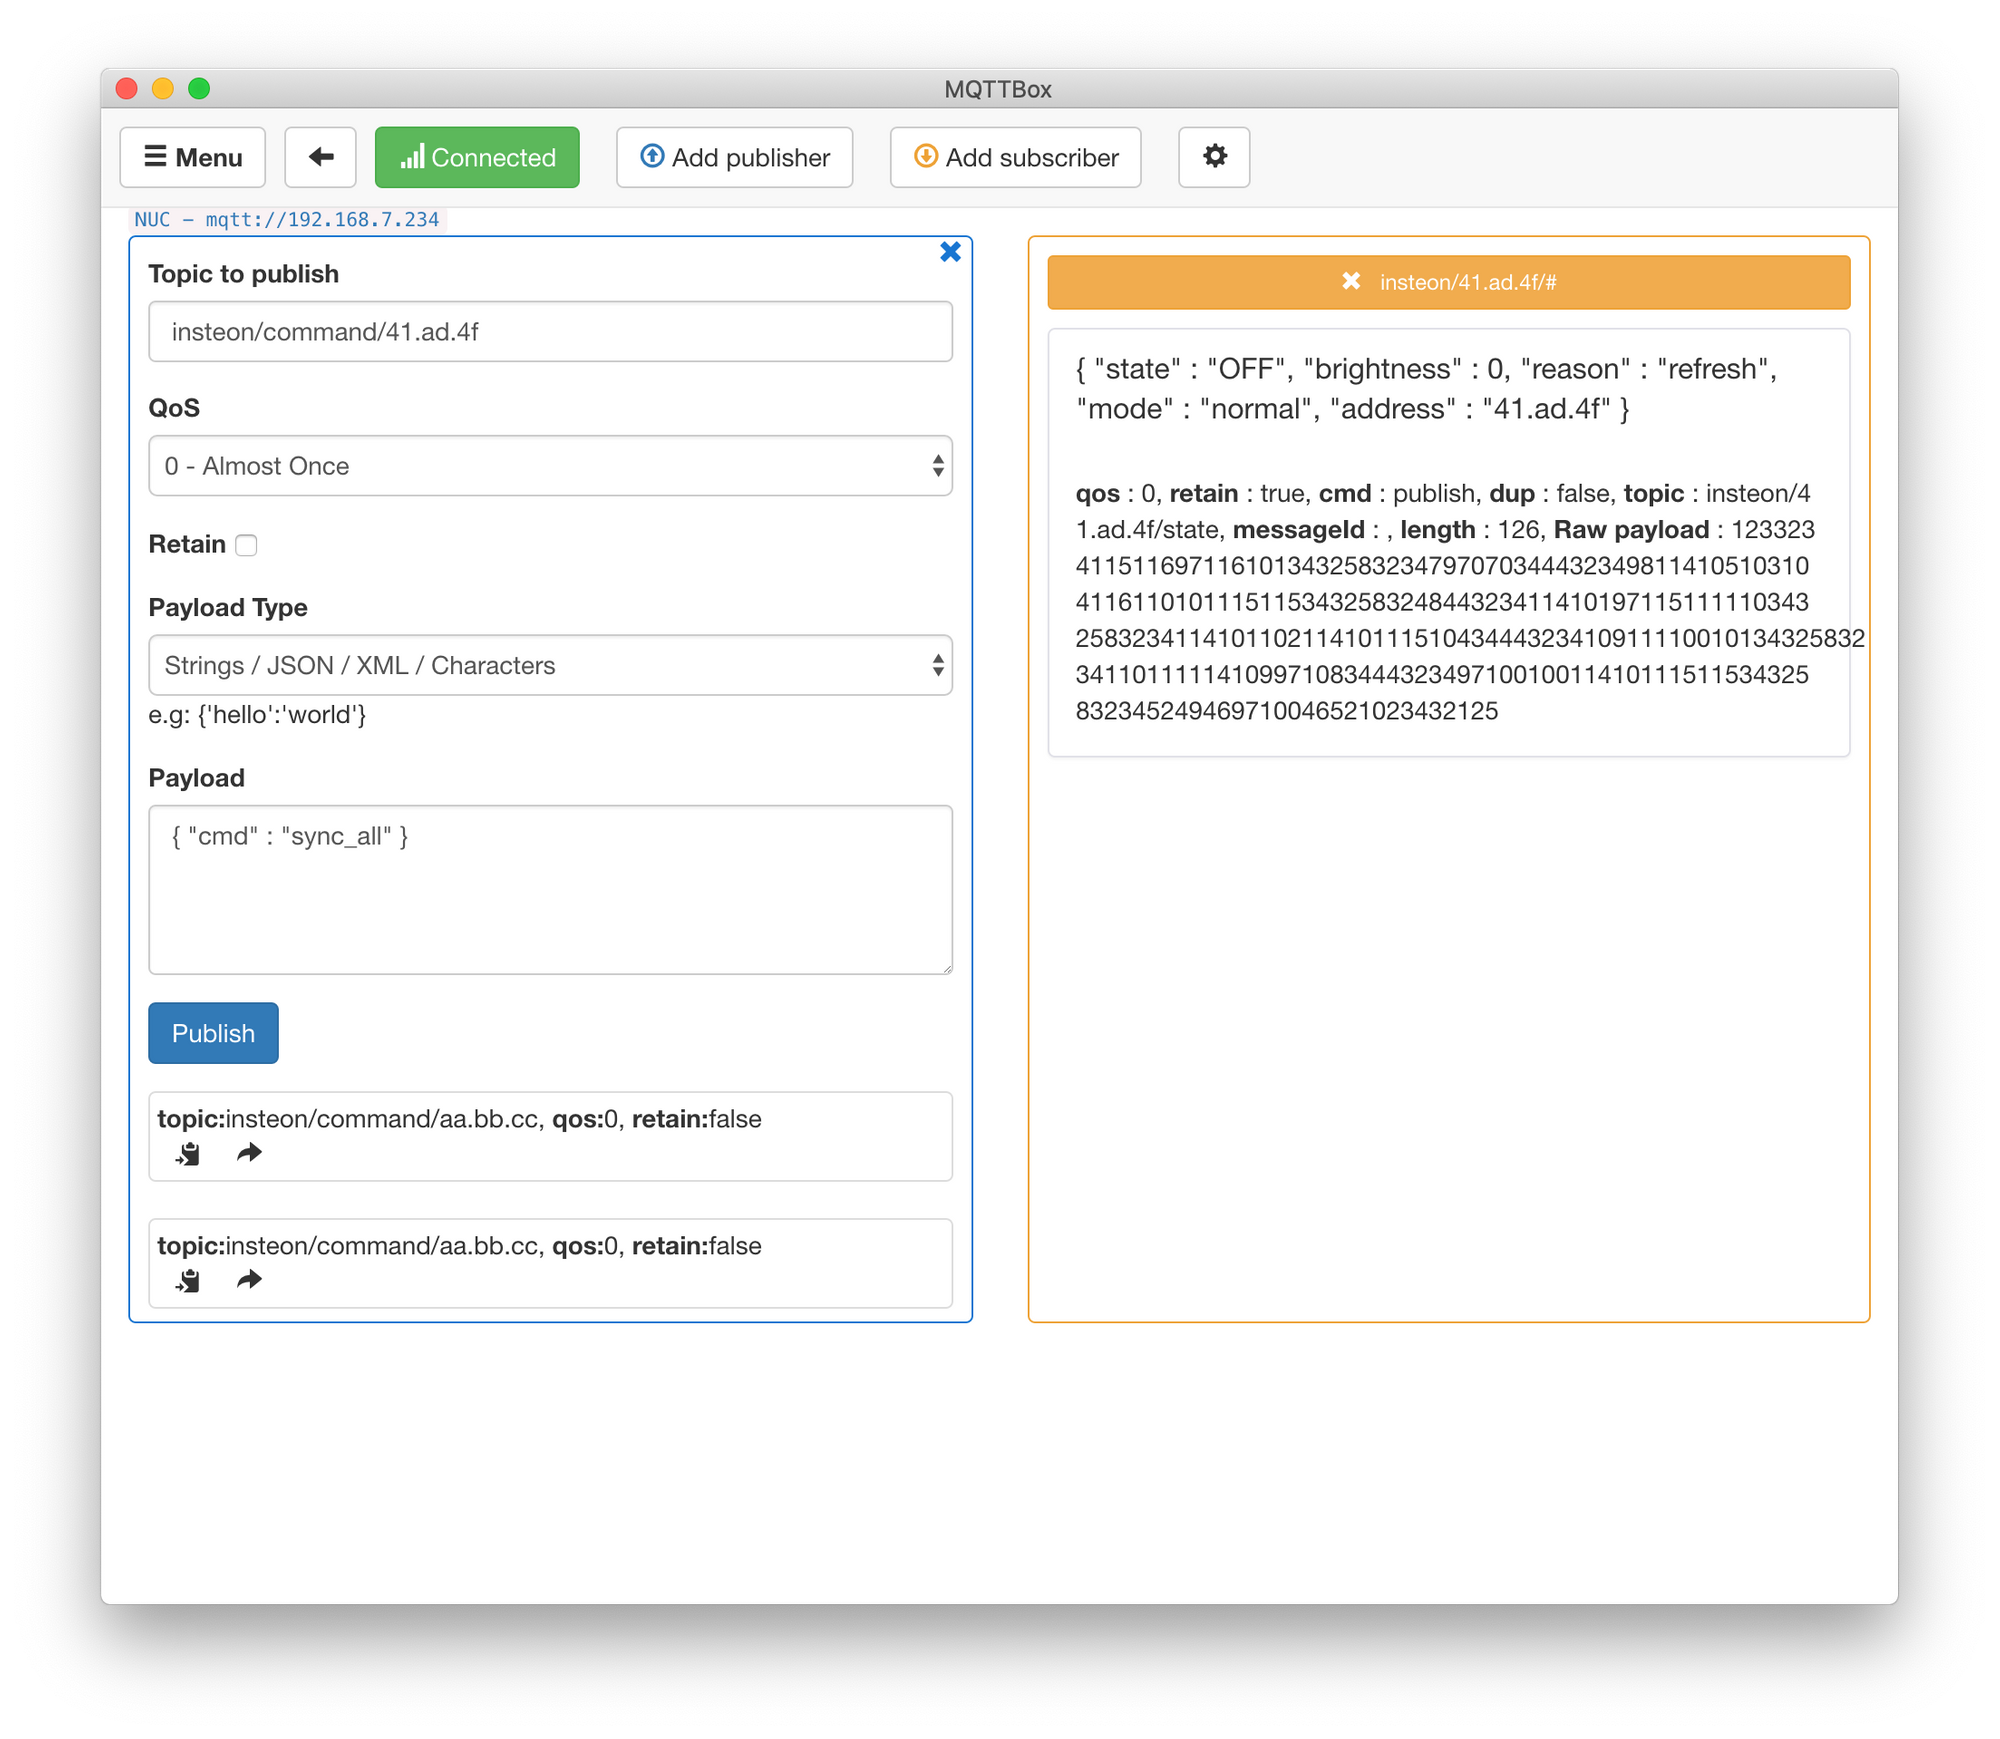
Once you are subscribed to your topic using the correct address of your device you should start to see messages coming through when you turn it on or off. If you aren't seeing messages coming through, be sure to double check the address of your device is correctly entered in the insteon_mqtt.yaml file, and in the topic you are subscribed to.
Additionally its always worth checking in on the logs from insteon-mqtt. They are extremely verbose and helpful.
docker-compose logsAdding to Home Assistant
Finally we need to add these devices into Home Assistant using MQTT Templates. Luckily there are very clear examples inside the insteon_mqtt.yaml file. Under the MQTT sections of each device type you will find examples and instructions for adding them to Home Assistant. We will be using the Dimmer as our example.
light:
  - platform: mqtt
    schema: json
    name: "insteon 1"
    state_topic: "insteon/aa.bb.cc/state"
    command_topic: "insteon/aa.bb.cc/level"
    brightness: true
So what now?
At this point we've successfully gotten an Insteon dimmer to communicate over MQTT and be integrated into Home Assistant. You can now automate and interact with that switch like any other dimmer that would have been added over Z-Wave or some other protocol.
I didn't end up stoping at this point though. In my old setup with Indigo, my Insteon dimmers controlled my Hue bulbs, and the Hue bulbs would update the state of the LED on the dimmers to reflect their brightness.
Soon I'll walk through what that process looked like and explain the different approaches I took until finally settling on Node Red being how I managed the automation.